

Front Crossmember Mounts
The purpose of these notes are to give some idea of the internal damage that rust can do, and one way of putting it all back together. The results might not be that pretty, but at least it's solid and is quite capable of passing a few more MoTs.
Damaged Area
The front ARB & front crossmember mounting points at the front of the chassis. The damage is caused mainly by internal corrosion and is partly hidden by the front crossmember itself. As most cars are covered in muck & underseal in this area you might not know anything is wrong until the ARB starts flapping in the breeze - like ours did. Apart from the annoying banging and clattering it makes (far louder than your radio will go) you'll find Mr MoT man will take a dim view as it's within 30cm of a suspension mounting point
What you'll need
- Welding gear
- Tinsnips
- Angle grinder with cutting/grinding discs
- Sheet steel
- Swear box
As far as I know there are no ready made repair sections for this area, you will be making everything yourself. So you'll also need an empty Corn Flakes box for making templates before cutting out the steel itself.
I used 3 steel thicknesses
- 0.7mm (approx) for the wheel arch with complex curvatures.
- 1.5mm for the ARB & Crossmember mounts
- 3mm for the ARB mounting brackets (you can get these but I was just too lazy to drive into town)
OK. Rather than describe the area, let the pictures do the talking.
Figure 1shows the view from the wheelarch after the ARB & front links have been removed & all the loose rust has been hit with a chipping hammer. As you can see, there's plenty of scope for the enthusiast.
To save time I used the cutting discs to remove the front links because although they weren't knocking they were quite rusty and after all this effort you're going to put new ones on, aren't you ?
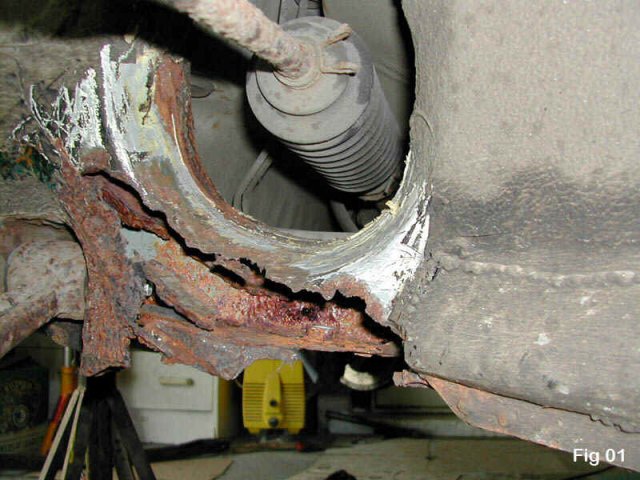
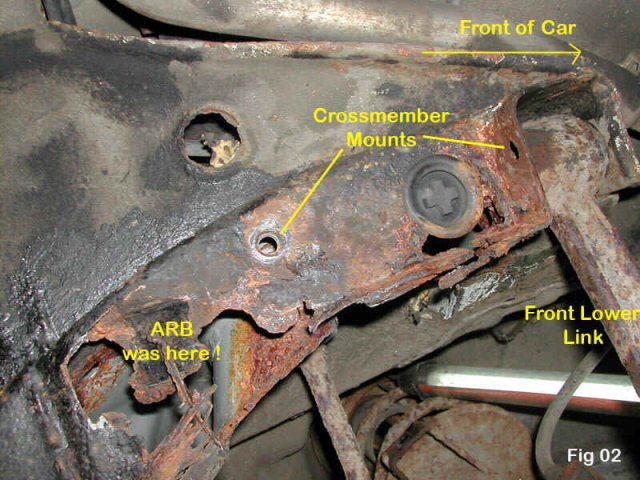
Figure 2is the view from underneath the car on the near side and shows just how serious the damage is. On my car one ARB mount had pulled away (this picture) and as you can see there were holes in the chassis which had been hidden by the front crossmember.
The first thing to do is to get the ARB & crossmember mounts in place. Fortunately the o/side of my car was still there, so I made a cardboard template of the missing section, marking the holes for the ARB & crossmember mounts. The n/side is simply a mirror image, so flip the template over and it works fine as a pattern. It's a simple flat section and quite practical to make it from a single piece of steel with 90deg folds for the lower flange section.
Cut the steel to fit, offer it up make sure all the mounting points are correct by measuring with calipers or a vernier gauge from the front link mounting plate. Get this wrong and it's a major hassle because all the mounts have captive nuts on the inside of the box section, so take your time here. Once the holes are marked & drilled, tack weld some nuts on the inside & leave the bolts in place to protect the threads while you're welding.
I tacked the plate in place and then offered up the x-member to make sure it fitted. Also check the ARB is aligned correctly to the axis of the car. Ok, I'm sure a couple of degrees out won't make that much difference, but any sloppiness here will be seen by the MoT man and you don't want him thinking you're a bodger, do you ?
Once you're happy with the fit, fully seam weld it in place. Unfortunately this is all under-the-car welding and so you'll probably need that swear box occasionally.
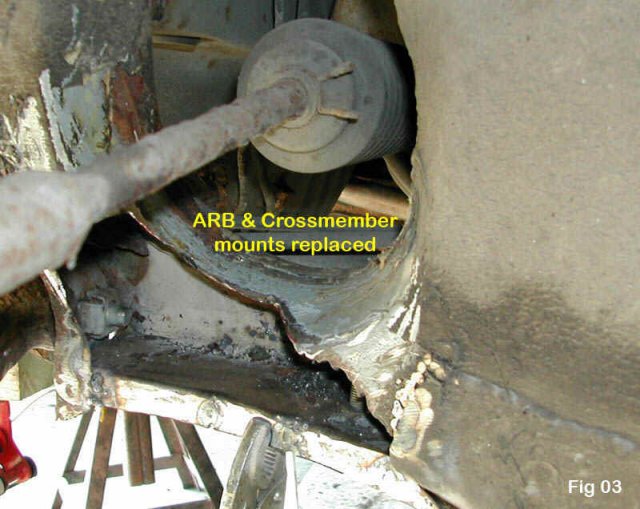
Figure 3shows the chassis mounting plates in place. You can also see some internal welding, it's not originally welded there but just an attempt to try to keep out water because my seam welding isn't watertight.
Eagle-eyed readers will note that I didn't make a hole for the rubber bung underneath the crossmember either....
At this point the repair degenerates into patchwork plating, the number of patches depending on how good you are at shaping metal in complex curvatures. I'm not, and as you can see I had several goes to fill the hole.....

Figure 4shows the first patch in place, lots of weld which will be dressed back later. Again this needs to be a seam weld for the MoT.......plug, stitch or tack welds won't do at this point. All you can do is to keep making cardboard templates and working your way around the wheelarch until you come back to solid metal.
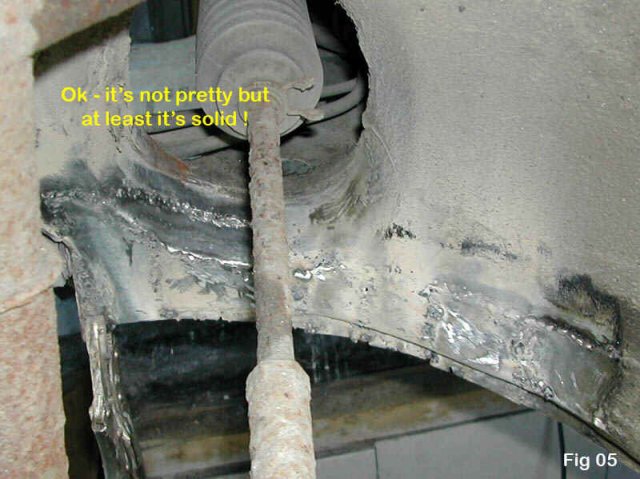
Figure 5shows my final repairs before operation "tidy-it-up" started. Yep, the welding isn't neat, but it is solid and once ground smooth, painted, a skim of sealer & some underseal it'll look quite respectable.
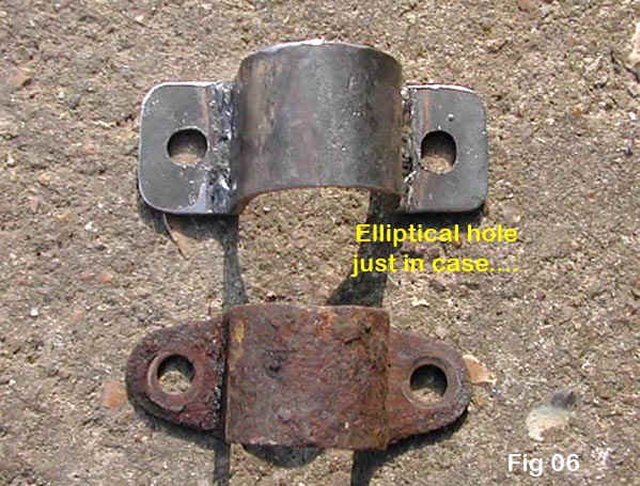
New ARB mounts are probably available from Toyota, but living out in the sticks I decided to make a couple rather than chase Mr T for some. I used 3mm steel but 2mm would probably be perfectly adequate. To bend this thickness you'll need red heat and I used a 1/2" drive socket as a former to get the radius to match the old ones. It sounds a lot of work, but only half an hour at most.
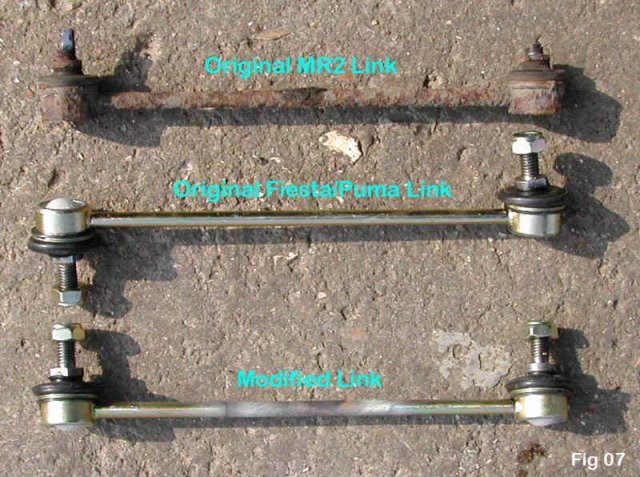
New drop links - at this point a note of thanks to Paul Woods of TwoBrutal fame for the suggestion to use Ford Fiesta ones. As you can see in the fig 7, these are exactly the same size as the OEM ones, they just have one mount facing the wrong way. They also have a spanner flat on the mounting bolt instead of a recessed allen key and so should be easier to remove when the time comes. 5 minutes with a blowlamp & a mole wrench and the job's a good 'un....
And that's about it.... now I wonder where the next ventilation hole will be ????
Acknowledgements : Paul Woods, Woodsport
b2hbm
25/3/2009
Copyright © by MR2 Owners Club All Right Reserved