


Nice work Clive!
Sent from my GT-I9300 using Tapatalk
My New Install
-
 madbasshunter
Topic author - Posts: 952
- Joined: 12/07/05 1:00
- Years of MR2 Ownership: 0
- MR2's Owned: 10
- Gender: Male
- Location: Cullompton Devon
- Been thanked: 1 time
Re: My New Install
About time I updated this 
Started running Speaker wire into the doors

If you unplug the door looms in the footwell you can pull the convoluted rubber tubes out of the pillar which makes it easier to run new wires through

you can use the old wires (blue and green O/S) to feed the new wire through
Also ran RCA's and speaker wire (8awg power cable for the sub) to the boot

Had to cut a hole for them to go through and protected with convoluted plastic

then cover with sound deadening as no rear speakers and fix wires to sound deadened bulkhead and refit carpet.

Some 0awg from the alternator to start the big three

Get speaker rings ready

-
madbasshunter
Topic author - Posts: 952
- Joined: 12/07/05 1:00
- Years of MR2 Ownership: 0
- MR2's Owned: 10
- Gender: Male
- Location: Cullompton Devon
- Been thanked: 1 time
Re: My New Install
Firstly I applied some sound deadening then got a tube of Polyurethane Adhesive Sealant which I applied to the back of the speaker rings then screwed them to the door using the oem mounting points and left it to set

I had a good think about where to put the crossovers as they should be as close to the woofer as possible, but if they are on the door card you have to run the wires through to remove and refit it. I toyed with them in the footwells then decided there wasn't room so

cut a hole in the door card whilst I was trimming it to clear the speaker ring

Then fitted the crossover and ran the wires

Sound deadened behind the tweeter

Fitted the woofer

Carried on with my cut out speaker grille to show off the woofer and you can see the crossover in the pocket

Finished door (until I change red lens to clear)

I also added puddle lights and perimeter protection to the alarm

-
madbasshunter
Topic author - Posts: 952
- Joined: 12/07/05 1:00
- Years of MR2 Ownership: 0
- MR2's Owned: 10
- Gender: Male
- Location: Cullompton Devon
- Been thanked: 1 time


-
madbasshunter
Topic author - Posts: 952
- Joined: 12/07/05 1:00
- Years of MR2 Ownership: 0
- MR2's Owned: 10
- Gender: Male
- Location: Cullompton Devon
- Been thanked: 1 time
Re: My New Install
Got some new leather inserts for the doorcards as there were a couple of scuffs and also fitted clear lenses

Which show the rainbow bulbs better


Which show the rainbow bulbs better
-
 SonicSW20
- Posts: 2858
- Joined: 29/11/10 19:50
- Years of MR2 Ownership: 10
- MR2's Owned: 3
- Location: UK
- Been thanked: 6 times
Re: My New Install
Do you have any details on the wiring runs for your boot mount amp? Considering moving mine there.
Rev5 Sonic Shadow

-
madbasshunter
Topic author - Posts: 952
- Joined: 12/07/05 1:00
- Years of MR2 Ownership: 0
- MR2's Owned: 10
- Gender: Male
- Location: Cullompton Devon
- Been thanked: 1 time
Re: My New Install
I went under the rear quarter window behind where the speakers fit and cut a hole
Then sound deadened over

Then fed the RCA and speaker cables down the side to the boot
Moved the starter relay then used the captive nut for the earth cable
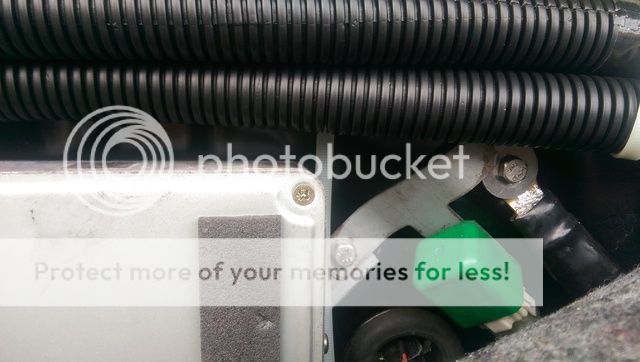
Speaker wires and RCA's come through the carpet behind the board

Then sound deadened over

Then fed the RCA and speaker cables down the side to the boot

Moved the starter relay then used the captive nut for the earth cable

Speaker wires and RCA's come through the carpet behind the board

-
SonicSW20
- Posts: 2858
- Joined: 29/11/10 19:50
- Years of MR2 Ownership: 10
- MR2's Owned: 3
- Location: UK
- Been thanked: 6 times
Re: My New Install
Ah, you have to cut a hole in the body to do it? I was hoping there was a non destructive route though.
Also, where have you taken power from? If it's from the battery, where have you routed that cable? I may have missed that bit.
Also, where have you taken power from? If it's from the battery, where have you routed that cable? I may have missed that bit.
Rev5 Sonic Shadow
-
madbasshunter
Topic author - Posts: 952
- Joined: 12/07/05 1:00
- Years of MR2 Ownership: 0
- MR2's Owned: 10
- Gender: Male
- Location: Cullompton Devon
- Been thanked: 1 time
Re: My New Install
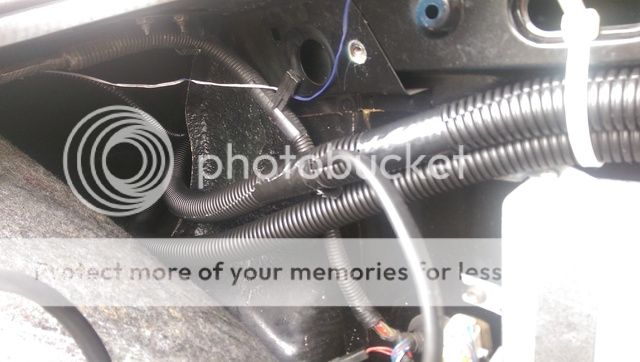
There are holes but they are not really big enough as you can see I could just squeeze a 4g cable in

So I got the stepped drill out
if you look at the right hand lower corner of the picture of my old build you will see the fused distribution block which is fed from the alternator

0g from the alternator to circuit breaker on the bulkhead then through the bulkhead via a drilled hole and grommet into the distribution block

-
SonicSW20
- Posts: 2858
- Joined: 29/11/10 19:50
- Years of MR2 Ownership: 10
- MR2's Owned: 3
- Location: UK
- Been thanked: 6 times
Re: My New Install
Is it OK to use the alternator? I'd have thought ripple voltage would be an issue? The battery essentially acts as a smoothing capacitor, by going direct to the alternator, you won't be getting that benefit?
Rev5 Sonic Shadow
-
madbasshunter
Topic author - Posts: 952
- Joined: 12/07/05 1:00
- Years of MR2 Ownership: 0
- MR2's Owned: 10
- Gender: Male
- Location: Cullompton Devon
- Been thanked: 1 time
Re: My New Install
I have put 0g from the alternator to the one side of the circuit breaker then to the starter wire and battery, and from the other side of the circuit breaker to the distribution box.
So it is between the alternator and the battery, which is an 096 battery the biggest I could fit

80 AH and over 800 amps (760 is an understated figure) plug on the top is for my C-tek charger
So it is between the alternator and the battery, which is an 096 battery the biggest I could fit

80 AH and over 800 amps (760 is an understated figure) plug on the top is for my C-tek charger
-
madbasshunter
Topic author - Posts: 952
- Joined: 12/07/05 1:00
- Years of MR2 Ownership: 0
- MR2's Owned: 10
- Gender: Male
- Location: Cullompton Devon
- Been thanked: 1 time
Re: My New Install
Got the amps fitted today and cut the cover

Now got to carpet it but rain stopped play.
Had a little play with it and on tickover the amp was getting 14.8v and on bass only dropped to 14.4

Now got to carpet it but rain stopped play.
Had a little play with it and on tickover the amp was getting 14.8v and on bass only dropped to 14.4
-
madbasshunter
Topic author - Posts: 952
- Joined: 12/07/05 1:00
- Years of MR2 Ownership: 0
- MR2's Owned: 10
- Gender: Male
- Location: Cullompton Devon
- Been thanked: 1 time

