Page 2 of 2
Re: Head Unit Help - Frankenstein's Monster...
Posted: 18/08/21 19:12
by jeff
benckj wrote: ↑17/08/21 9:43
My apologies, yes dual, unless you care to draw pistols at dawn.
Thank you for the correction.
sorry
bit of a pet peeve along with duel entry turbos, duel carriageways and duel fronted properties
Re: Head Unit Help - Frankenstein's Monster...
Posted: 25/08/21 8:22
by 50ShadesOfRed
Thanks all!
Super fun times now however, as not shy of some overkill I decided to totally de-interior the car while chasing wires (easier....right....

). Upon closer inspection it appears that 6 out of the 8 speakers are totally knackered, so replacements have been bought too.
Looks like what was a "simple" head unit change has become a complete audio system overhaul - will update with how I get on...
Re: Head Unit Help - Frankenstein's Monster...
Posted: 25/08/21 12:54
by jeff
if you have the time/inclination a writeup with pictures would be interesting addition to the knowledge base
Re: Head Unit Help - Frankenstein's Monster...
Posted: 25/08/21 14:40
by jimi
jeff wrote: ↑25/08/21 12:54
if you have the time/inclination a writeup with pictures would be interesting addition to the knowledge base

Definitely, even if you just put it all in a thread, I can convert it to a KY2 article

Re: Head Unit Help - Frankenstein's Monster...
Posted: 25/08/21 20:06
by benckj
I’m not surprised your speakers are toast. They are very poor quality and seem to fall apart making them near useless. On my latest car a 98GT they dissengrated to dust leaving only rear magnet and inner cone.
Best purchase new speakers all around and fit into existing locations. It will take a little fabrication as often the new ones will be larger at 6-6.5”. Run new cables to each as OEM is very small and often damaged. Ditch the rear subs including amp and your life will be much easier. This will open up rear cubby holes for storing tools, t-top bags, fire extinguisher, etc.
Just my 0.02cents worth. There are write-ups in other Mr2 forums on how to do should you get stuck. It’s not complicated if your replacing all components.
Re: Head Unit Help - Frankenstein's Monster...
Posted: 11/09/21 22:23
by 50ShadesOfRed
Okie doke.
Me again!
So. I've had thr time to start removing the old wiring/ amp etc all sorts and that's now complete.
However I'm left with the following (I'm assuming) 2x stock wire groups with no plugs & three "loose" wires:
Pink with blue stripe
Black with red stripe
White with green stripe
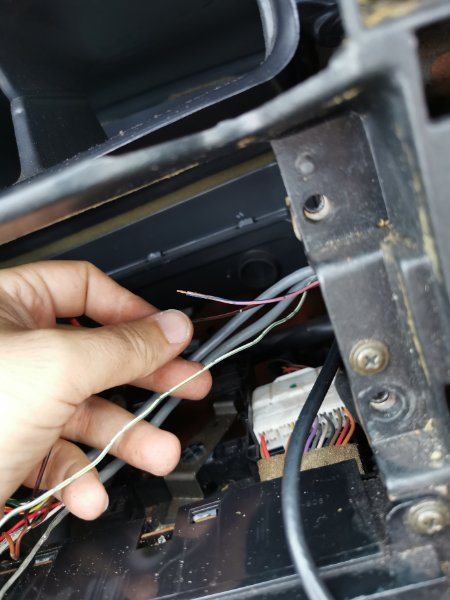
- IMG_20210911_181931.jpg (159.48 KiB) Viewed 68 times
Brown with two dots
Red with two dots
Blue " "
Green " "
Yellow " "
Black " "
White " "
(+Random bare wire?)
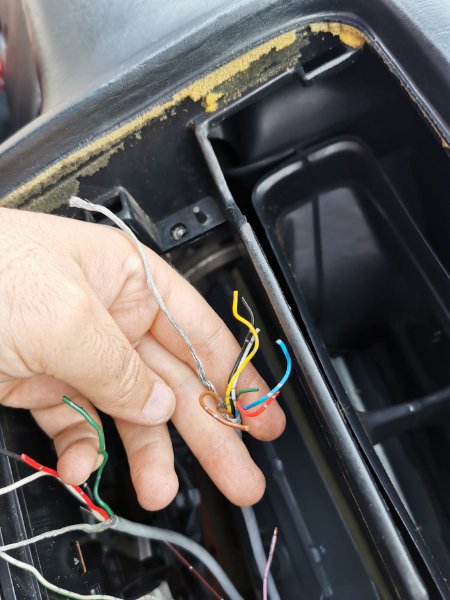
- IMG_20210911_181915.jpg (167.82 KiB) Viewed 68 times
Green with one dot
Red with one dot
Black with one dot
White with one dot
(+Random bare wire)
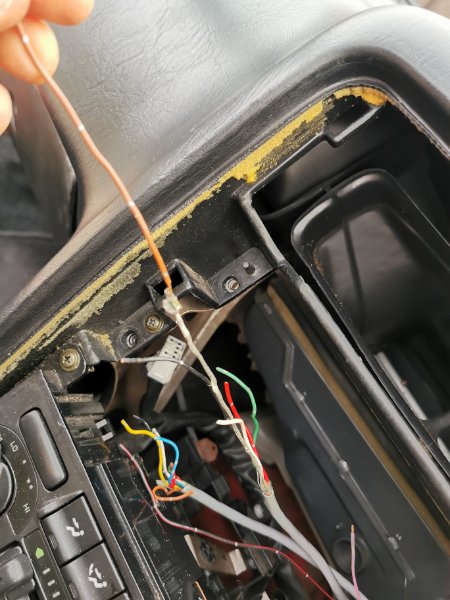
- IMG_20210911_181908.jpg (184.91 KiB) Viewed 68 times
I can't seem to figure out what wires are the live/earth etc as they don't seem to match any guides I've seen - the guides all mention a "grey" wire, but unless I'm colourblind I can't see one ...
Any gurus feel like wading in?
Pretty please?
-awkward smile-

Re: Head Unit Help - Frankenstein's Monster...
Posted: 12/09/21 2:49
by jimi
Never assume, assumption is the mother of all "censored"
AFAIK, those 2 grey multi core wires (ie the coloured .wires with dots) are not standard.
The 3 loose wires could be standard IF they go into the main loom, can you see where they go ? Do the colours match up with the power antenna wiring on the standard diagrams ?
Re: Head Unit Help - Frankenstein's Monster...
Posted: 12/09/21 15:48
by 50ShadesOfRed
Ok, I've dug around even more and the two grey wires go into the loom (I think?) And the others looks to be coming out of it also

Stumped. Can't make head nor tail of it
This is what I've got...
Everywhere I look things seem to have the silver "dots" however?
(Other connectors etc)
The grey wires also run down the length of the armrest/console etc, so are these 100% not supposed to be here?
Re: Head Unit Help - Frankenstein's Monster...
Posted: 12/09/21 17:47
by jimi
The silver dots on the Toyota wiring don't mean anything or at least they are not part of the colour coding, only main colour/trace colour are relevant.
Those grey wires don't look standard to me if they are not wrapped as part of the loom then I'm fairly sure Mr T didn't put them there, should be relatively easy to trace them to the end.
Re: Head Unit Help - Frankenstein's Monster...
Posted: 12/09/21 18:02
by 50ShadesOfRed
Oh I see
Ok, they were wrapped (sort of) with black tape but had been hacked into & spliced together pretty badly - there was a screw-type connector block and all sorts going on in there! I had to take it all off to see what was really going on.
I have been madly googling/searching and came across a thread on here where a member was reinstating his "active" system (which is what my 2 has/had).
The wiring colours seem to match up, but upon wiring in my ISO adapter....
... Nada
(Dodgy connector block re-use to save me soldering/crimping needlessly
)

- IMG_20210912_170902.jpg (161.14 KiB) Viewed 59 times
So now I'm (50%) more confident the colours at least match someone else's 2... It's troubleshooting time I guess.
Either that or I just wire things direct from the battery and bypass Mr T's loom completely and live without the radio antenna

(doing that for the amp + speakers anyway so... Food for thought)
Re: Head Unit Help - Frankenstein's Monster...
Posted: 12/09/21 23:50
by jimi
Been looking through my files and came across these diagrams, which appear to correspond with what you have. Looks like the two grey cables are original

you can see on the diagram they are shown as shielded (the bare wires are shielding) and the colours appear to match
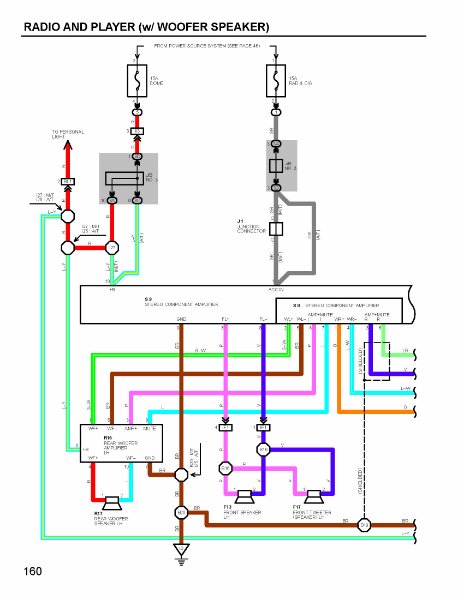
- 1995-MR2-Wiring-Diagram 156.jpg (143.62 KiB) Viewed 53 times

- 1995-MR2-Wiring-Diagram 157.jpg (138.42 KiB) Viewed 53 times
The two grey cables should end up on the passengers side behind the trim panel under the rear quarter window (thats where the original amps were located)
Looks like the pink/blue & black/red wires are for the aerial. The white/green is an unknown at the moment, still looking to see if I can identify it. I can put a pdf copy of those pages in the downloads section if you want ?
Re: Head Unit Help - Frankenstein's Monster...
Posted: 04/12/21 10:12
by 50ShadesOfRed
Update!
The stereo, after a lot of swearing, works!
Turns out the white wire was the constant live (?) After all...
Amplifier is now also wired up and I have 6 out of the 8 speakers live and blasting my eardrums - Better than nowt!
The driver's door loom is so tight due to the alarm bits being wired through there that I'm having trouble getting the speaker wire to that location, but as soon as time/ weather permits it will be vanquished (sworn at until it fits) once and for all.
Pics incoming soon...
Re: Head Unit Help - Frankenstein's Monster...
Posted: 04/12/21 10:57
by jimi
your making good progress, big step gettiing it working

 ). Upon closer inspection it appears that 6 out of the 8 speakers are totally knackered, so replacements have been bought too.

 (doing that for the amp + speakers anyway so... Food for thought)